0 Tutorial outline
Firmware download and instructions
Burn Touch firmware V2.0
Burn Host firmware V2.01
Burn LED firmware V2.0
Precautions
1 Firmware download and instructions
Download the firmware package
Compressed package name: TASOLLER_firmware_20210419_V2.01.zip
Release Date: 2021/4/19
Version number: V2.01
Before upgrading the firmware, you need to know
Touch firmware V2.0 can only be used with Host V2.01 firmware and LED V2.0 firmware.
Touch firmware V2.0 is not compatible with Host V1.1 firmware and LED V1.1 firmware.
Update content
Touch firmware V2.0 uses pressure-sensitive transmission;
Host firmware V2.01 improves the contradiction between center seam and floating trigger. Fix bugs in 8key mode. Fix the relationship between Sensor and mode.
Added the FN2 function. Double-click FN2 to temporarily stop outputting the key value; double-click FN2 again to restore the output key value;
Add 4key layout, switch key combination FN1 + pad 25 / pad 26;
2 Burn Touch firmware V2.0
List of required tools
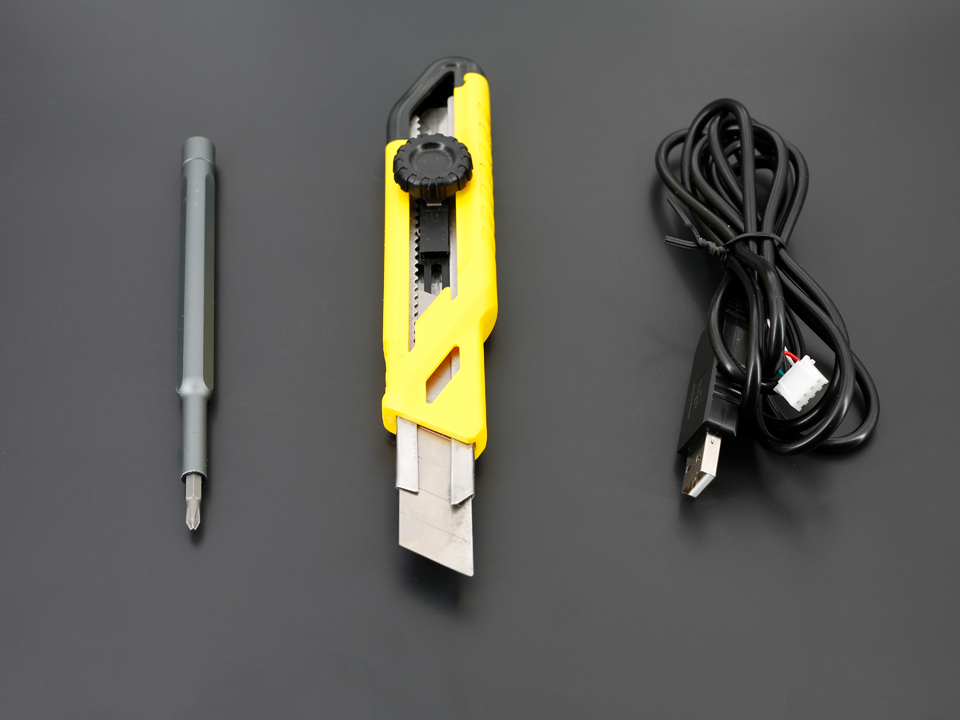
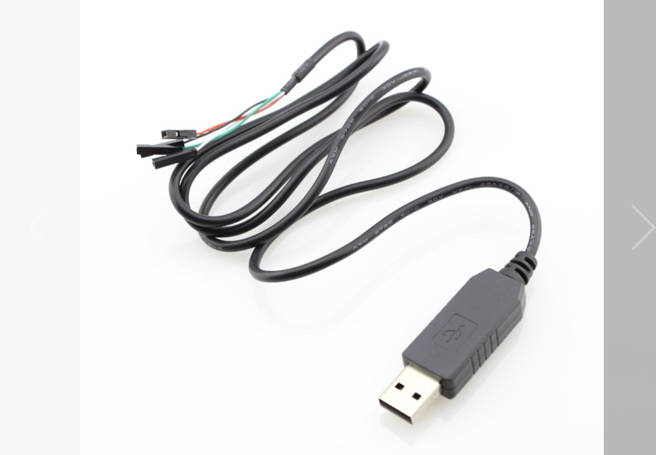
USB to UART burning cable (you can buy it yourself or on gamo2.com. If you don’t have UART burning experience, try to use the USB UART burning cable provided by the gamo2 store).
Phillips screwdriver.
Paper knife.
Buy USB UART burning cable by yourself, you need to know.
The USB UART cable model is TTL, VCC=5V, RXD=3.3v, TXD=3.3v; for appearance, please refer to the figure below:
The touch PCB serial port line sequence is shown in the figure:
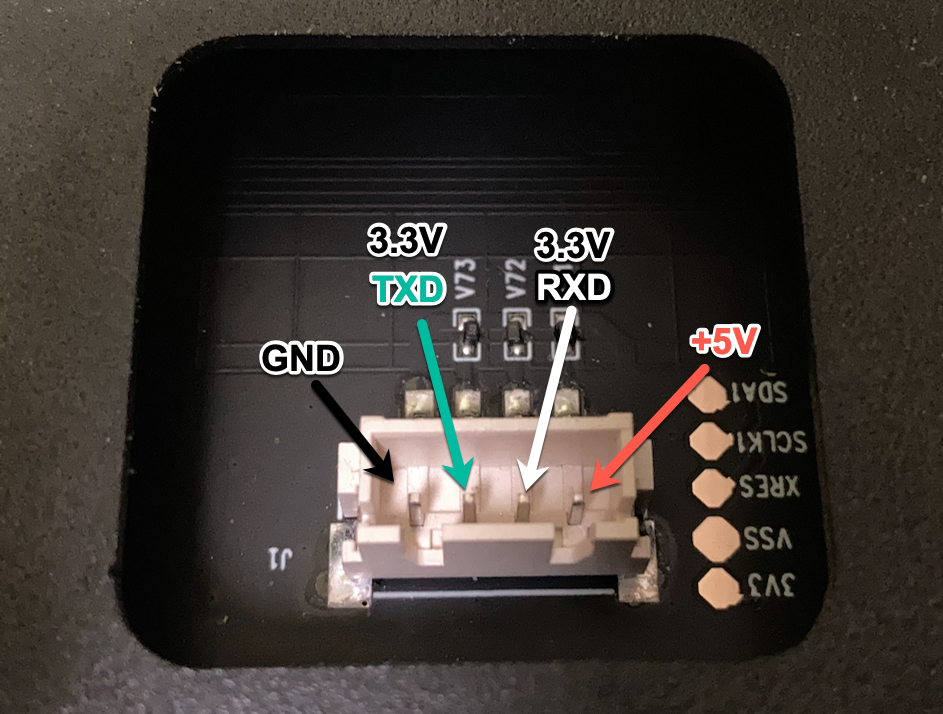
If you buy a USB UART cable by yourself, be sure to pay attention to the line sequence problem. If 5V and GND are reversed, the PCB may be burned down.
For the USB UART cable purchased by yourself, please be sure to fix the connection cable by hand during the burning process.
Burning steps
-
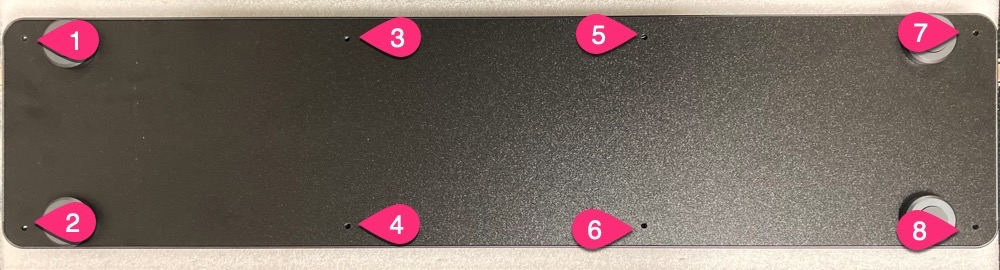
Use a Phillips screwdriver to remove the 8 screws at the bottom;
-
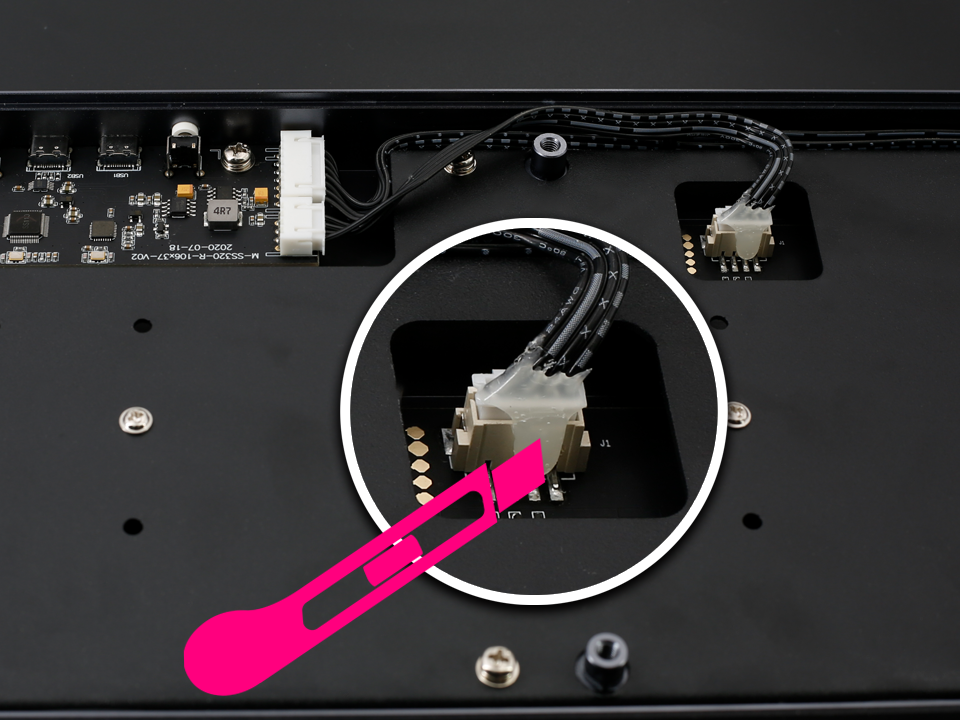
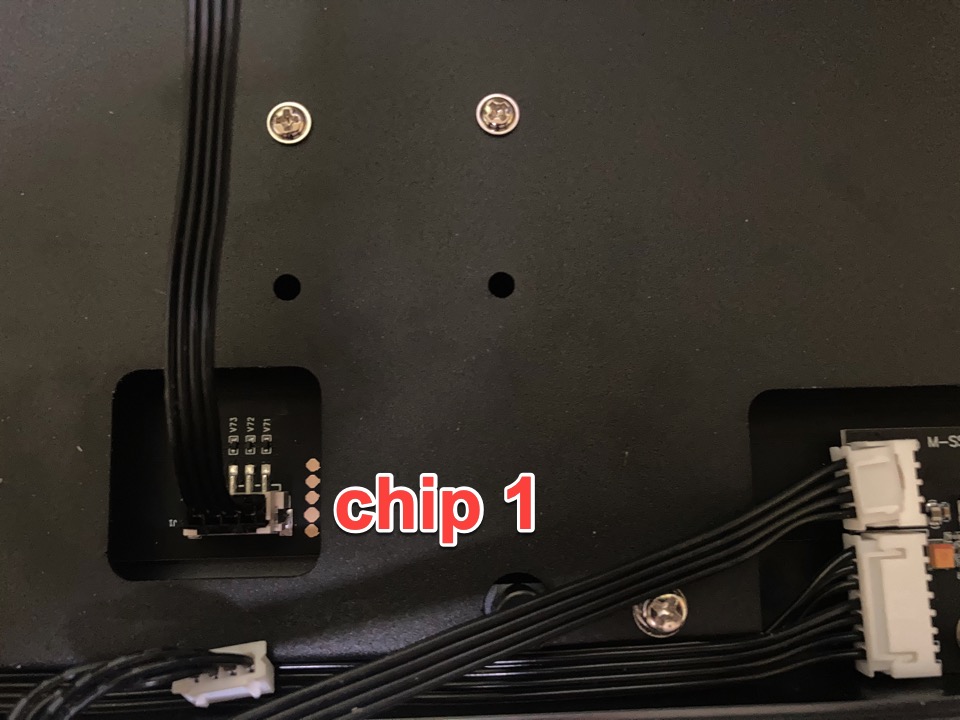
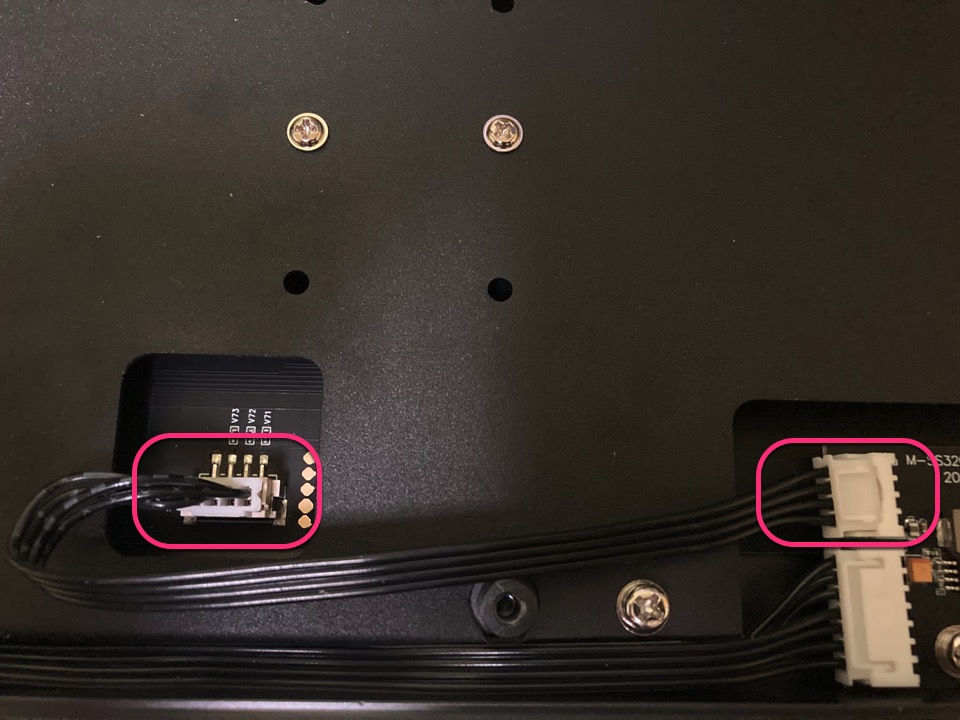
Use a paper knife to gently remove the glue on the 4PIN line at the chip 1 position, and unplug the 4PIN line; Note: Be sure not to exert too much effort, which may damage the 4PIN female socket.
-
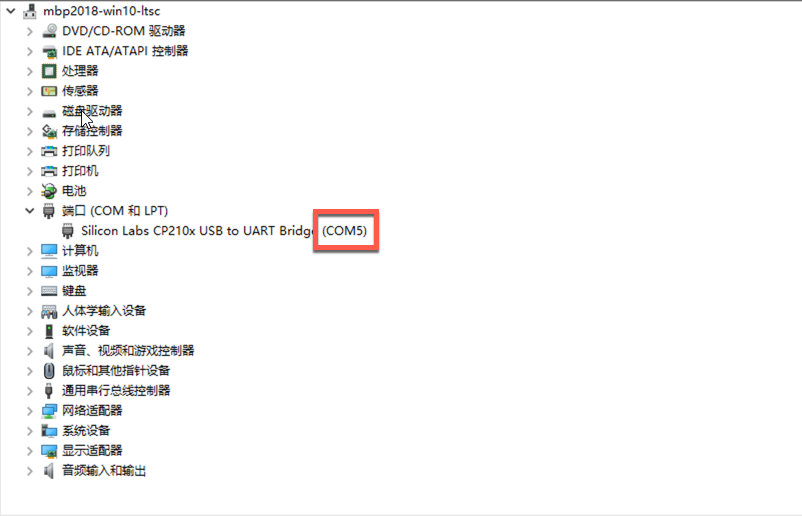
Connect the USB UART burning line to the USB interface of the PC, and wait for windows10 to automatically install the driver; please remember the COM port number COM X. COM5 in the figure is an example, yours may be COM2~COM10.
-
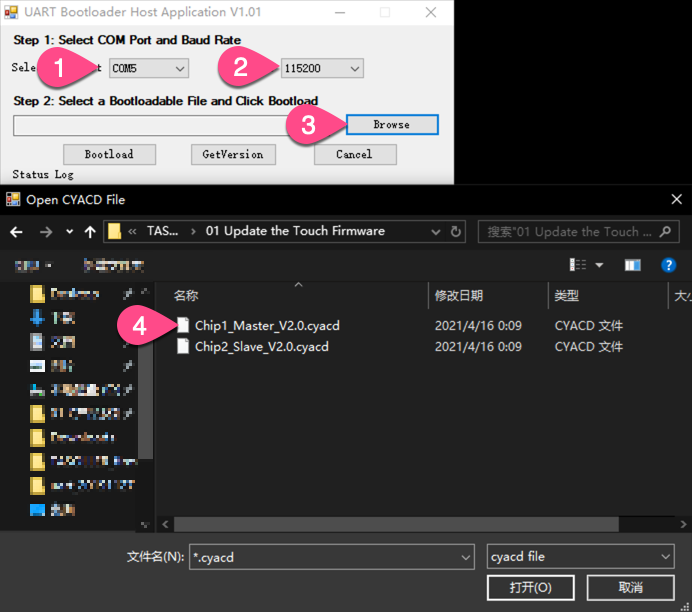
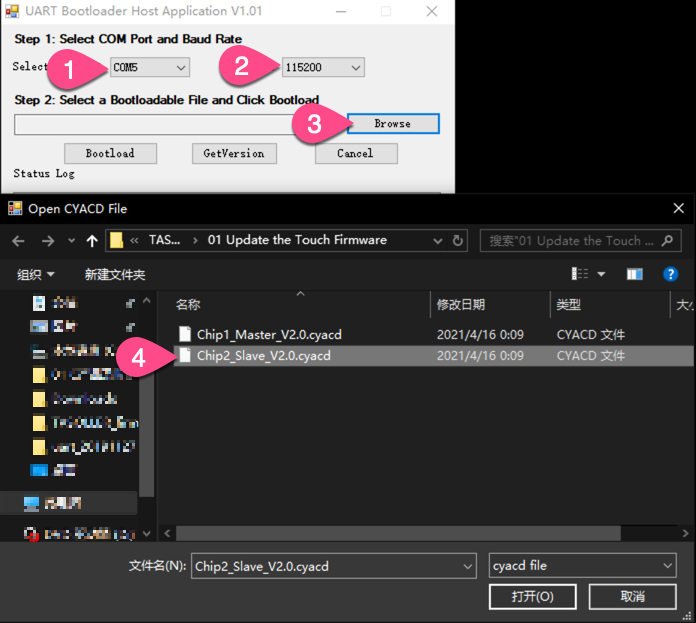
Open UART Bootloader Host Application V1.01.exe and select the serial port, as shown in the figure.
PS: There may be multiple COM ports, do not select COM1. Select Chip1 firmware Chip1_Master_V2.0.cyacd.
-
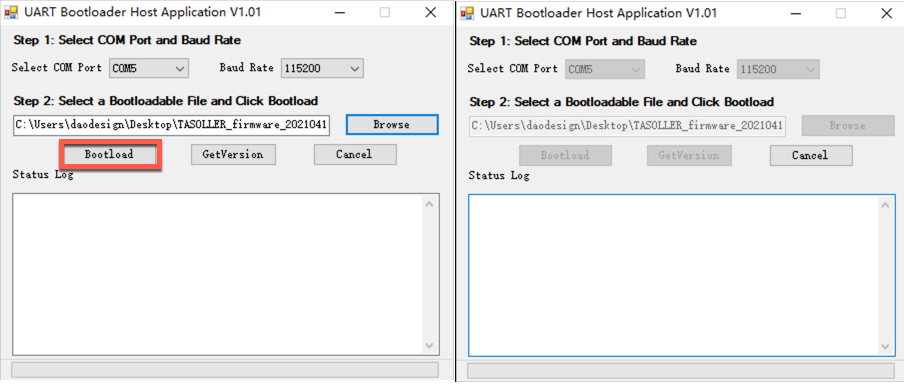
Click the BootLoader button.
-
Insert the 4PIN male connector of the serial cable into the 4PIN female connector at position of the chip 1.
-
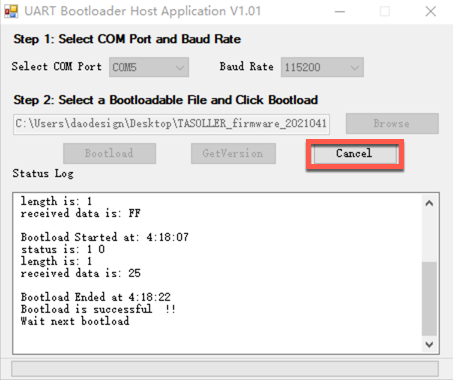
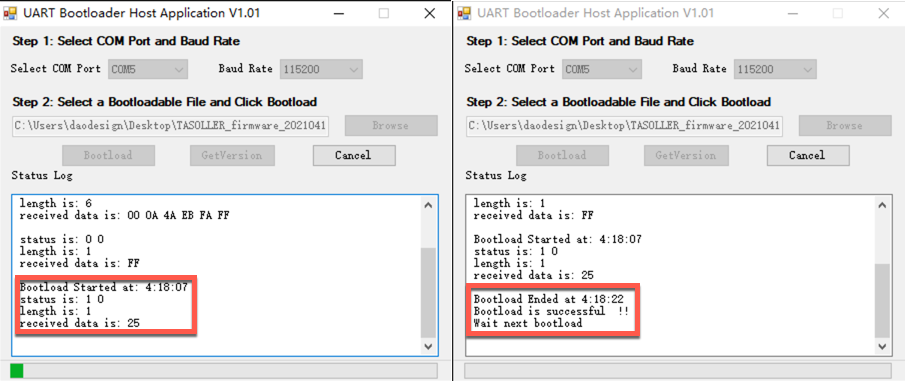
Wait for the progress bar to finish, as shown in the figure. If the prompt is incorrect, it may be that the 4PIN interface of the USB UART programming cable is in poor contact with the 4PIN female socket of Touch PCB. Try a few more times.

-
Click the Cancel button
-
Select the chip 2 firmware Chip2_Slave_V2.0.cyacd
-
Click the BootLoader button.

-
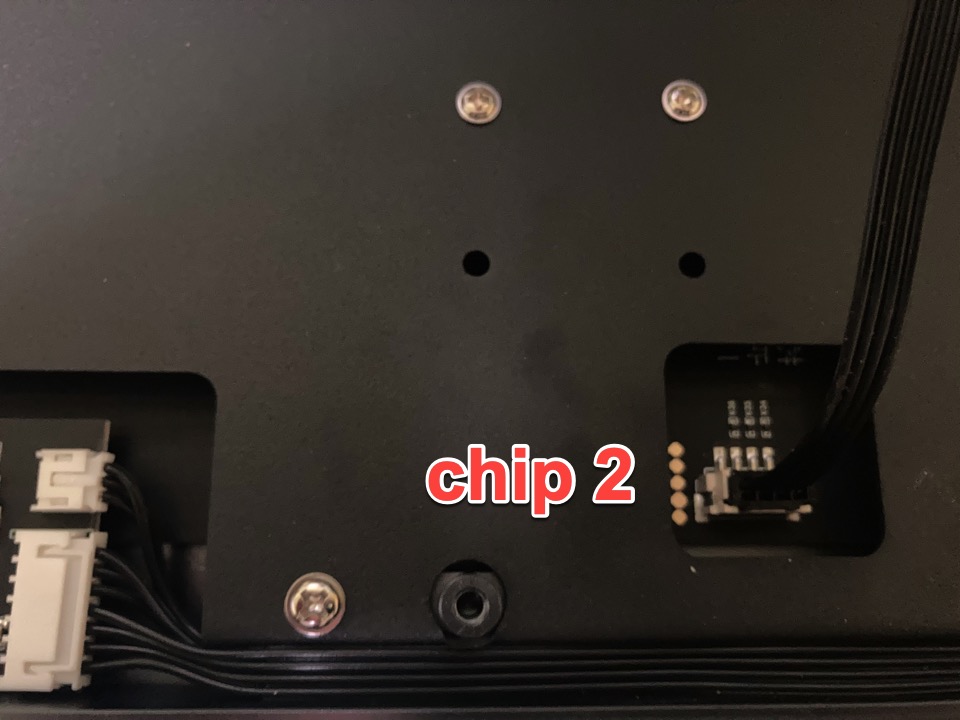
Insert the 4PIN male connector of the USB UART programming cable into the 4PIN female connector at position of the chip 2.
-
Wait for the progress bar to finish. If the prompt is incorrect, it may be that the 4PIN interface of the USB UART programming cable is in poor contact with the 4PIN female socket of Touch PCB. Try a few more times.
-
After the upgrade, re-insert the male end of the 4PIN line of the circuit board.
-
Complete
3 Burn Host firmware
-
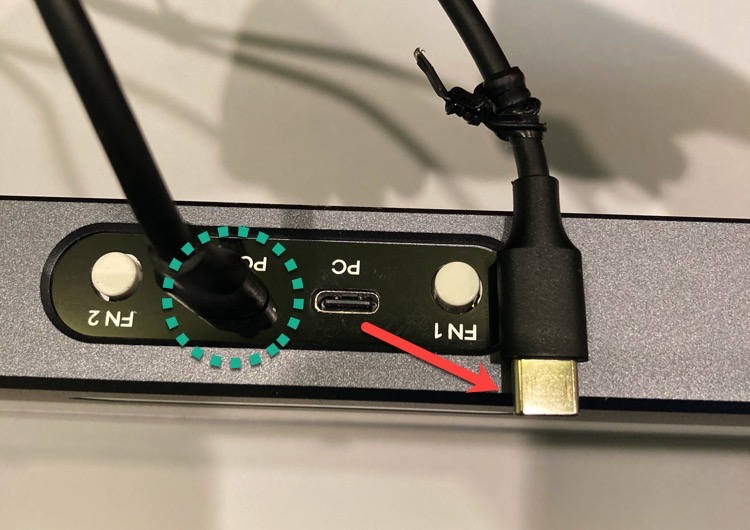
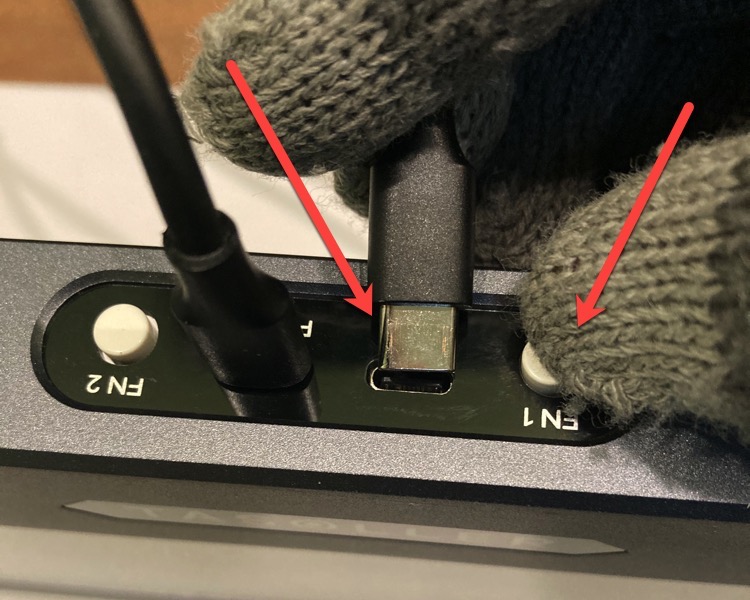
"Disconnect the USB-C interface with ""PC"" written on TASOLLER;
PS: The USB-C interface with the word ""POWER"" on TASOLLER can be disconnected or disconnected without affecting the upgrade. "
-
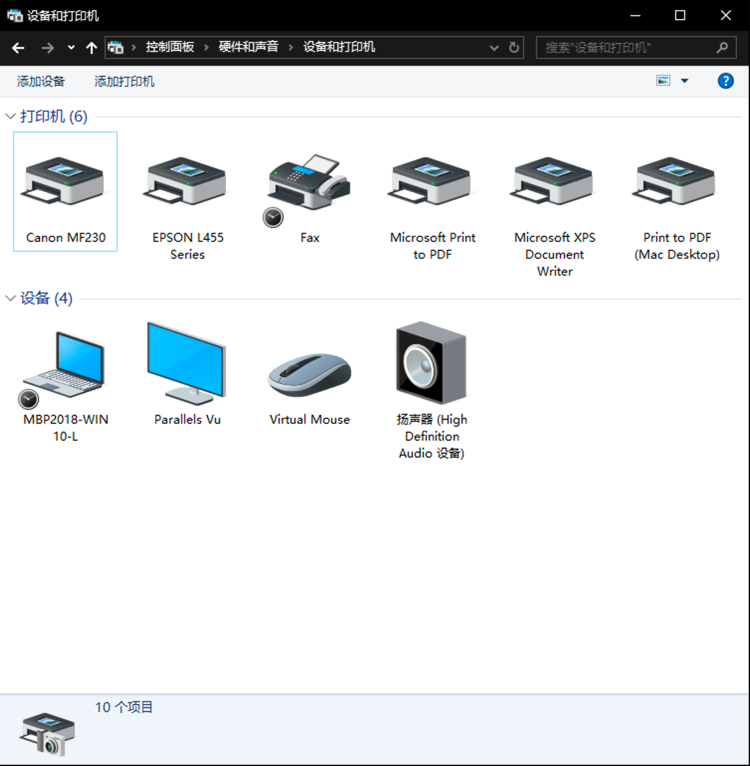
Open "Control Panel" and open " Devices and Printers".
(Note: For the convenience of confirmation, whether windows has recognized the upgrade status of TASOLLER)
-
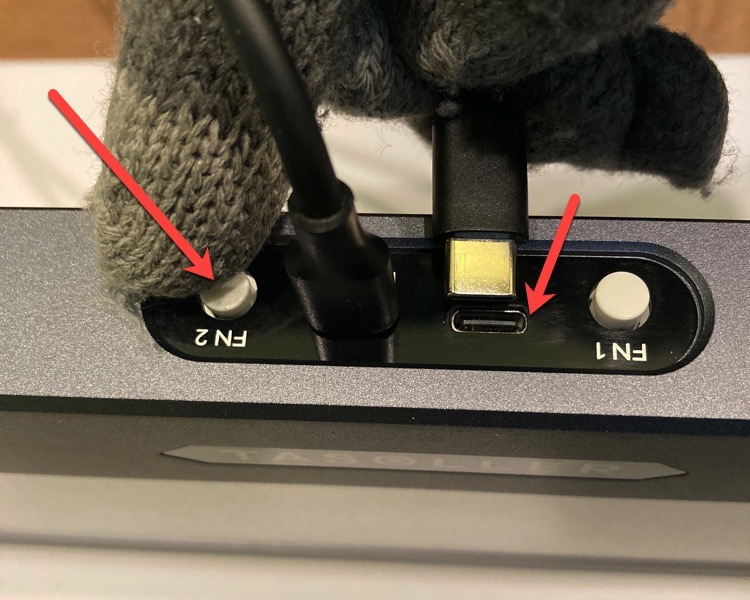
Press the FN2 button without letting go, and plug the USB-C cable into the USB-C port with the text "PC". After inserting the USB-C, don’t release FN2 until you see the HOSTMCU icon on the "Devices and Printers" page, then let go.
(Note: FN2 is to be pressed for about 1~2 seconds)

-
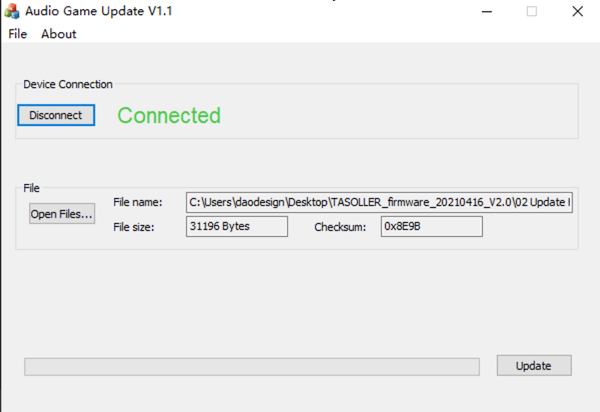
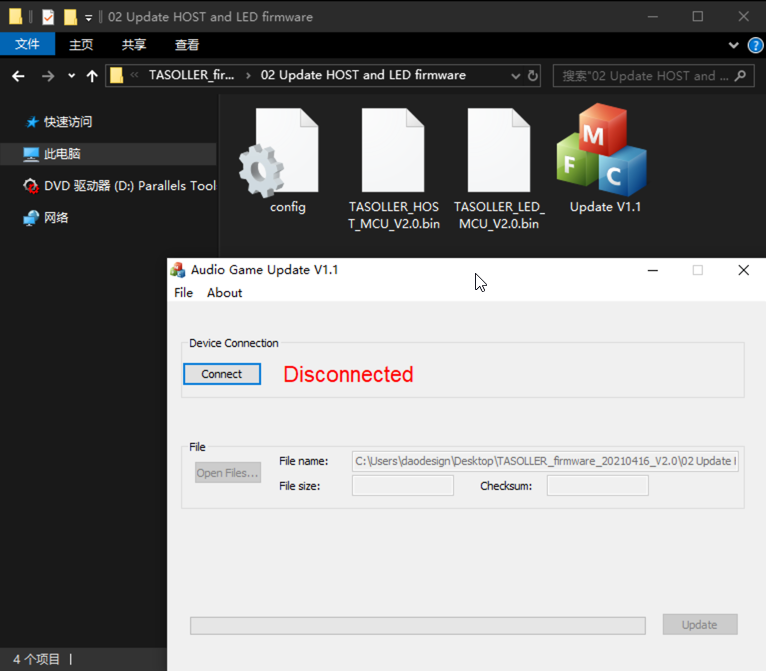
Open Update V1.1.exe

-
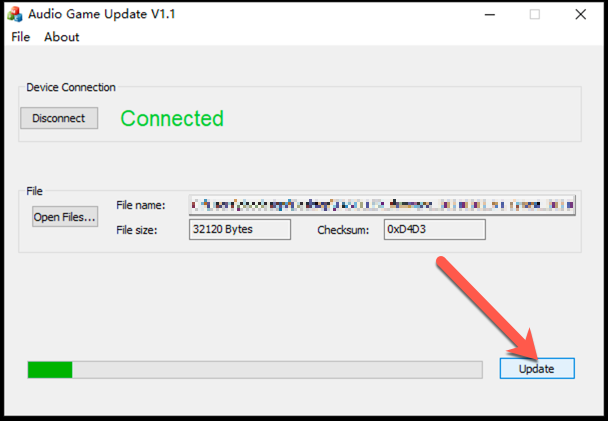
Click Connect, if the connection is successful, Connect will turn green.
-
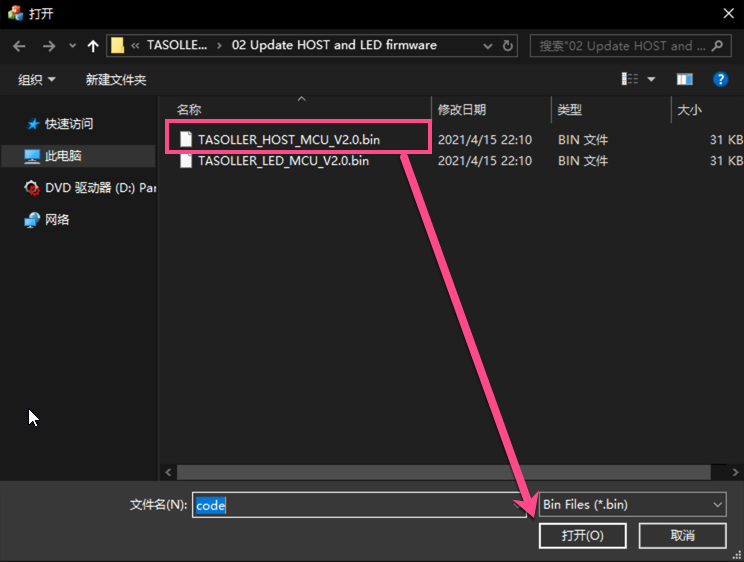
Click the Open Files… button and select the TASOLLER_HOST_MCU_V2.0.bin file in the directory
-
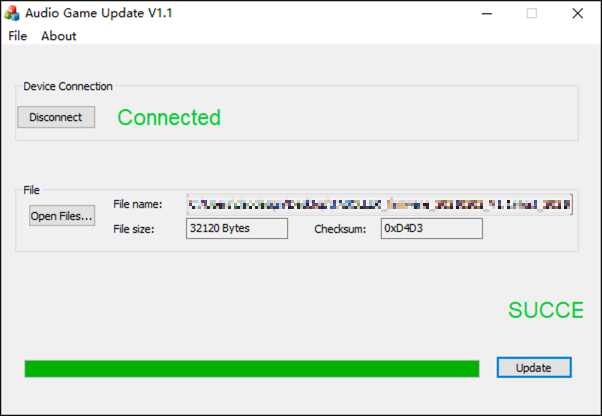
Click Update button.

-
After the progress bar is 100%.
-
Complete the upgrade. Replug the USB-C.
4 Upgrade LED firmware
-
Disconnect the USB-C interface with ""PC"" written on TASOLLER;
PS: The USB-C interface with the word ""POWER"" on TASOLLER can be disconnected or disconnected without affecting the upgrade.

-
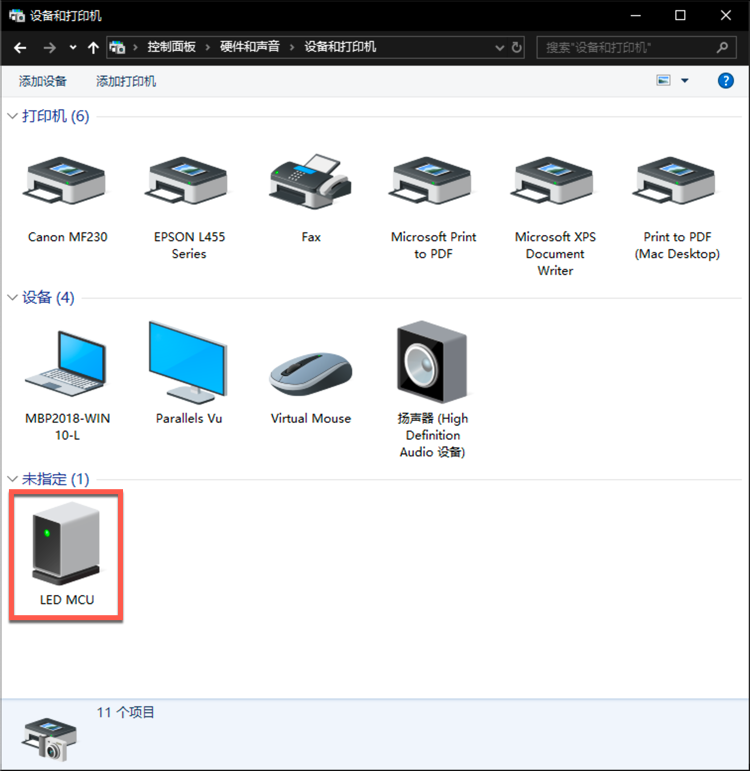
Open "Control Panel" and open "Devices and Printers".
(Note: For the convenience of confirmation, whether windows has recognized the upgrade status of TASOLLER)

-
Press the FN1 button without letting go, and plug the USB-C cable into the USB-C port with the text "PC". After inserting the USB-C, do not release FN1 until you see the LED MCU icon on the "Devices and Printers" page, then let go.
(Note: FN1 is to be pressed for about 3~5 seconds)
-
Open Update V1.1exe
-
Click Connect, if the connection is successful, Connect will turn green.

-
Click the Open Files… button and select the TASOLLER_LED_MCU_V2.0.bin file in the directory

-
Click Update button.
-
After the progress bar is 100%.

-
Complete the upgrade. Close the Update V1.1.exe software.
Re-plug USB-C.
5 Precautions
When upgrading the LED firmware, FN2 needs to be pressed for a longer time, there are 2 ways to determine;
-
Hear the sound of a new USB device recognized by windows;
-
In "Devices and Printers", you can see the LEDMCU or HOSTMCU device icon;
Common problems and solutions
-
If in the case of FN2, the LED firmware was upgraded (the HOST firmware should have been upgraded), don't worry, just upgrade the HOST firmware again.
-
If in the case of FN1, the HOST firmware is upgraded (it should have upgraded the LED firmware), don't worry, just upgrade the LED firmware again.
-
If there are any problems during the upgrade. Close the Update V1.1.exe file, reopen it, and follow the steps to upgrade again.